Java Message Service(JMS)
JMS: Java Messaging service is a
Java API that allows applications to create, send, receive, and read messages
using reliable, asynchronous, loosely coupled communication.

Setting up JMS in WebSphere Application
Server :
To use JMS API we have to configure
Server:
Here we used same server for Producer and Consumer (WebSphere
Application Server (WAS)) .
There are 6 steps for Setting
up JMS in WebSphere Application Server:
1)
Creating a service integration bus In WAS:
The
first step in setting up JMS in IBM WebSphere Application Server is
to create the service integration bus, the virtual place where messages are
exchanged. A service integration bus supports applications using message-based
and service-oriented architectures. A bus is a group of interconnected servers
and clusters that have been added as members of the bus. Applications connect
to a bus at one of the messaging engines associated with its bus members.
Procedure:
1.
Log in to the WebSphere Application
Server administrative console.
2.
Expand Service integration and click
Buses

.
3.
Click New.
4. Enter a name and optional description for the service
integration bus. For example, Bus11.
5.
Clear the Secure check box but keep
all the other default settings.
6.
Click Apply.
7.
Click the Save link at the top of
the screen.
8.
Click Save.

2)
Adding WAS server (or IBM Information Server) as a member of the service
integration bus.(Here we have added WAS server):
After you create a service integration
bus, you must add IBM Information Server as a member. Bus members
are the servers and clusters that have been added to the bus.
Procedure:
1.
In the WebSphere Application Server
administrative console, expand Service integration and click Buses.
2.
In the Buses pane, click the name of
the bus to which you will add IBM Information Server as a member. For example, Bus11.
3.
In the Topology panel, click Bus
members.

4.
Click Add.
5.
Click Server and select the instance
of WebSphere Application Server on which IBM Information Server runs. For
example Node01:server1.

6.
Click Next and Finish.
7.
Click the Save link at the top of
the screen.
8.
Click Save .

3)
Defining queues and topics in the service integration bus.
Queues and topic
spaces are the two types of destinations within a bus. A bus destination is a
virtual place within a service integration bus, to which applications attach as
producers, consumers, or both to exchange messages.
Procedure:
1.
In the WebSphere Application Server
administrative console, expand Service integration and click Buses.
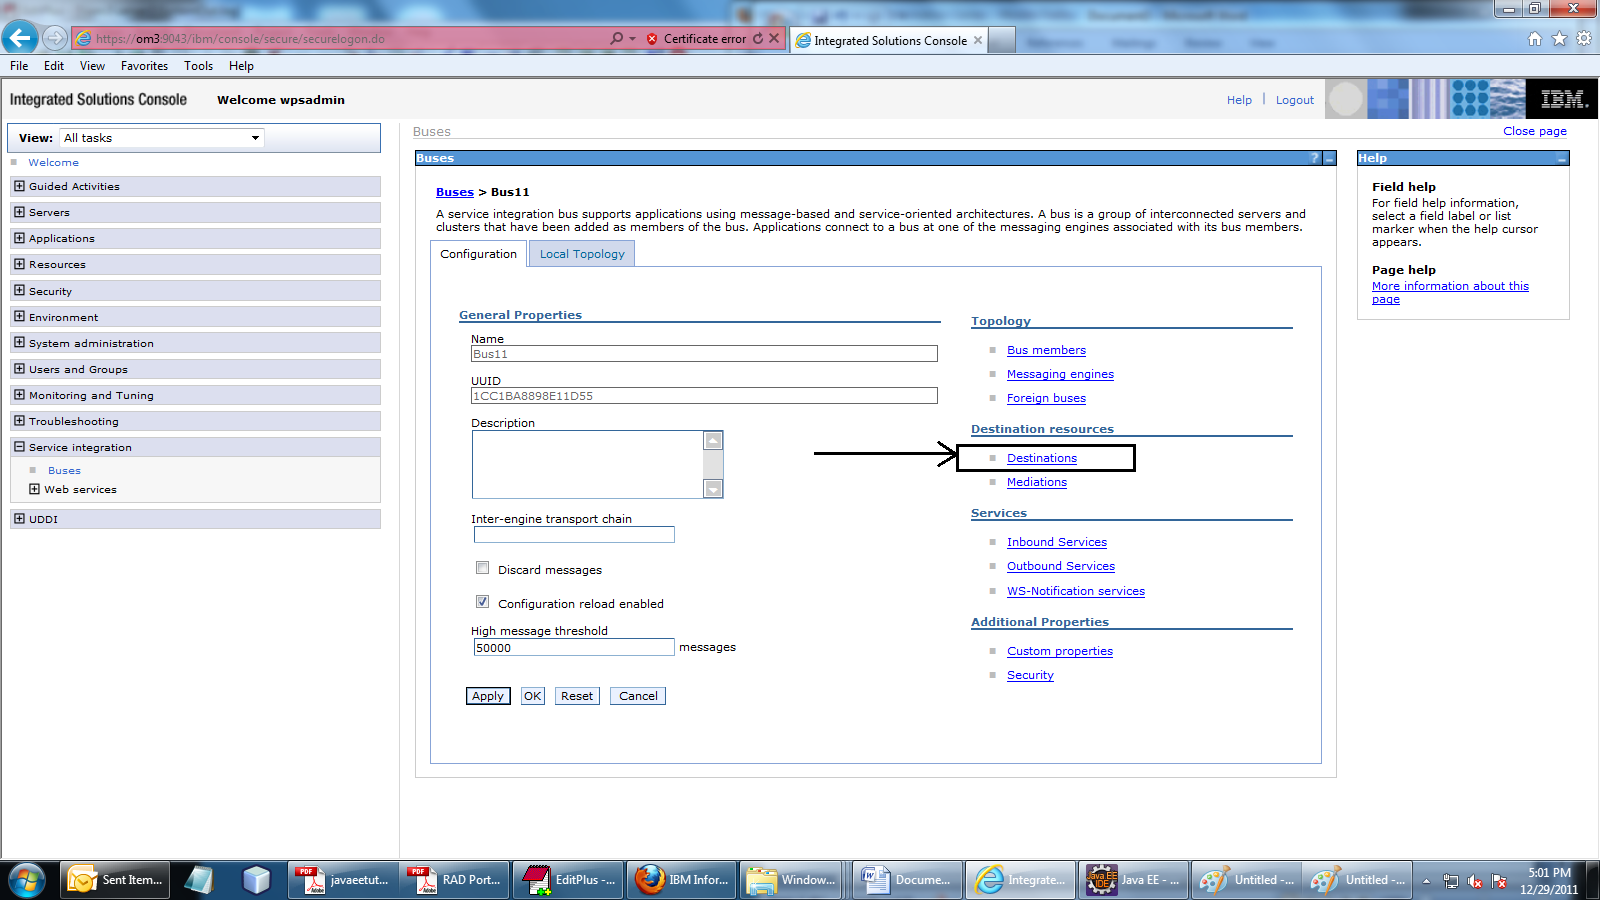
2.
In the Buses pane, click the name of
the bus for which you will define queues or topics. For example, Bus11.
3.
In the Destination Resources panel,
click Destinations.
4.
Click New.
5.
Click Queue or Topic space and click
Next.
6.
Enter an identifier and an optional
description for the queue or topic space. For example, RequestQueue11.
7.
Click Next until you reach the
confirm window. Click Finish.
8.
Repeat steps 4 through 7 until you
have created the number of queues or topic spaces that you need for your
application. At least two queues or topic spaces are recommended so that you
have one for service requests and one for service responses.
9.
Click the Save link at the top of
the screen.
10. Click Save .

4)
Associating JMS queues and topics:
A JMS
queue is used as a destination for point-to-point messaging. A JMS topic is
used for JMS publish and subscribe messaging.
Procedure:
1.
In the WebSphere Application Server
administrative console, expand Resources > JMS Providers and click Default
messaging.

2.
In the Destinations panel, click JMS
queue.

3.
In the Default Messaging Provider
pane, click New.
4.
Enter a name for the JMS request queue.
For example, MyRequestQueue11.
5.
Enter a JNDI name for the JMS
request queue. As a convention, use a JNDI name of the form jms/Name, where
Name is the logical name of the resource. For example, jms/MyRequestQueue.
6.
In the Connection panel, select the
bus name of the service integration bus.
7.
Select the queue name of the service
integration bus request queue.
8.
Keep all the other default settings
and click OK.

9.
Repeat steps 3 through 8 until you
have created the number of queues that you need for your application. At least
two queues are recommended so that you have one for service requests and one
for service responses.
10. Click the Save link at the top of the screen.
11. Click Save .

5)
Creating a JMS connection factory:
A JMS connection
factory is used to create connections to the associated JMS provider of JMS
queues for point-to-point messaging, or JMS topics for publish and subscribe
messaging.
Procedure:
1.
In the WebSphere Application Server
administrative console, expand Resources > JMS Providers and click Default
messaging.
2.
In the Connection Factories panel,
click JMS connection factory.

3.
In the Default Messaging Provider
pane, click New.
4.
Enter a name for the JMS connection
factory. For example, MyQueueConnectionFactory11.
5.
Enter a JNDI name for the JMS connection
factory. For example, jms/MyQueueConnectionFactory11.
6.
In the Connection panel, select the
bus name of the service integration bus.
7.
Keep all the other default settings
and click OK.

8.
Click the Save link at the top of
the screen.
9.
Click Save .

6)
Creating a JMS activation specification:
A JMS activation specification is
associated with one or more message-driven beans (MDB) and provides the
configuration necessary for them to receive messages.
Procedure:
1.
In the WebSphere Application Server
administrative console, expand Resources > JMS Providers and click Default
messaging.

2.
In the Activation Specifications
panel, click JMS activation specification.
3.
In the Default Messaging Provider
pane, click New.
4.
In the Administration panel, enter a
name for the JMS activation specification. For example, MyActivationSpecification.
5.
Enter a JNDI name for the JMS
activation specification. For example, jms/MyActivationSpecification.
6.
In the Destination panel, select Queue
if the destination name in the next step is a queue. Select Topic if it is a
topic.
7.
In the Destination JNDI name field,
enter the JNDI name of the JMS request queue or topic. For example, jms/MyRequestQueue.
8.
In the Bus name menu, select the
service integration bus. For example Bus11.

9.
Keep all the other default settings
and click OK.
10. Click the Save link at the top of the screen.
11. Click Save.
Then we create two Projects
one as Producer and the other as Consumer.
Here is the code for these
two:
Producer:
|
<%@page
import="javax.jms.*" %>
<%@page
import="javax.naming.*" %>
<%
final int NUM_MSGS = 5 ;
Context jndiContext = null;
try {
jndiContext = new
InitialContext();
} catch (NamingException e) {
System.out.println("Could not
create JNDI API context: " + e.toString());
System.exit(1);
}
ConnectionFactory connectionFactory =
null;
Destination dest = null;
try {
connectionFactory = (ConnectionFactory)
jndiContext.lookup("jms/MyQueueConnectionFactory11");
dest = (Destination)
jndiContext.lookup("jms/MyRequestQueue11");
} catch (Exception e) {
System.out.println("JNDI API
lookup failed: " + e.toString());
e.printStackTrace();
System.exit(1);
}
Connection connection = null;
MessageProducer producer = null;
try {
connection =
connectionFactory.createConnection();
Session session1 =
connection.createSession(false, Session.AUTO_ACKNOWLEDGE);
producer =
session1.createProducer(dest);
TextMessage message =
session1.createTextMessage();
for (int i = 0; i < NUM_MSGS;
i++) {
message.setText("This is
message " + (i + 1));
System.out.println("Sending message: " + message.getText());
producer.send(message);
}
producer.send(session1.createMessage());
} catch (JMSException e) {
System.out.println("Exception occurred: " + e.toString());
} finally {
if (connection != null) {
try {
connection.close();
} catch (JMSException e) {
}
}
}
%>
|
Brief explanation of JMS
Producer:

Consumer:
|
<%@page
import="javax.jms.*" %>
<%@page
import="javax.naming.*" %>
<%
String destName = null;
Context jndiContext = null;
ConnectionFactory connectionFactory =
null;
Connection connection = null;
Destination dest = null;
MessageConsumer consumer = null;
TextMessage message = null;
Session session1 = null;
try {
jndiContext = new InitialContext();
} catch (NamingException e) {
System.out.println("Could
not create JNDI API context: " + e.toString());
System.exit(1);
}
try {
connectionFactory = (ConnectionFactory)
jndiContext.lookup("jms/MyQueueConnectionFactory11");
dest = (Destination)
jndiContext.lookup("jms/MyRequestQueue11");
} catch (Exception e) {
System.out.println("JNDI API
lookup failed: " + e.toString());
System.exit(1);
}
try {
connection =
connectionFactory.createConnection();
session1 =
connection.createSession(false, Session.AUTO_ACKNOWLEDGE);
consumer = session1.createConsumer(dest);
connection.start();
while (true) {
Message m =
consumer.receive(1);
if (m != null) {
if (m instanceof
TextMessage) {
message =
(TextMessage) m;
System.out.println("Reading message: " + message.getText());
} else {
break;
}
}
}
} catch (JMSException e) {
System.out.println("Exception
occurred: " + e.toString());
} finally {
if (connection != null) {
try {
connection.close();
} catch (JMSException e) {
}
}
}
%>
|
Brief explanation:

Here is the result:

Important Links :
Please Give your valuable comments if find useful.
No comments:
Post a Comment